先来看一个玄乎的案例.
我使用[UIImage imageNamed:@"large_leaves_70mp.jpg"];这个方法去加载一个7033 × 10110 pixels的大图.第一感觉加载非常的慢.之后内存飙升…
先来看一张内存图: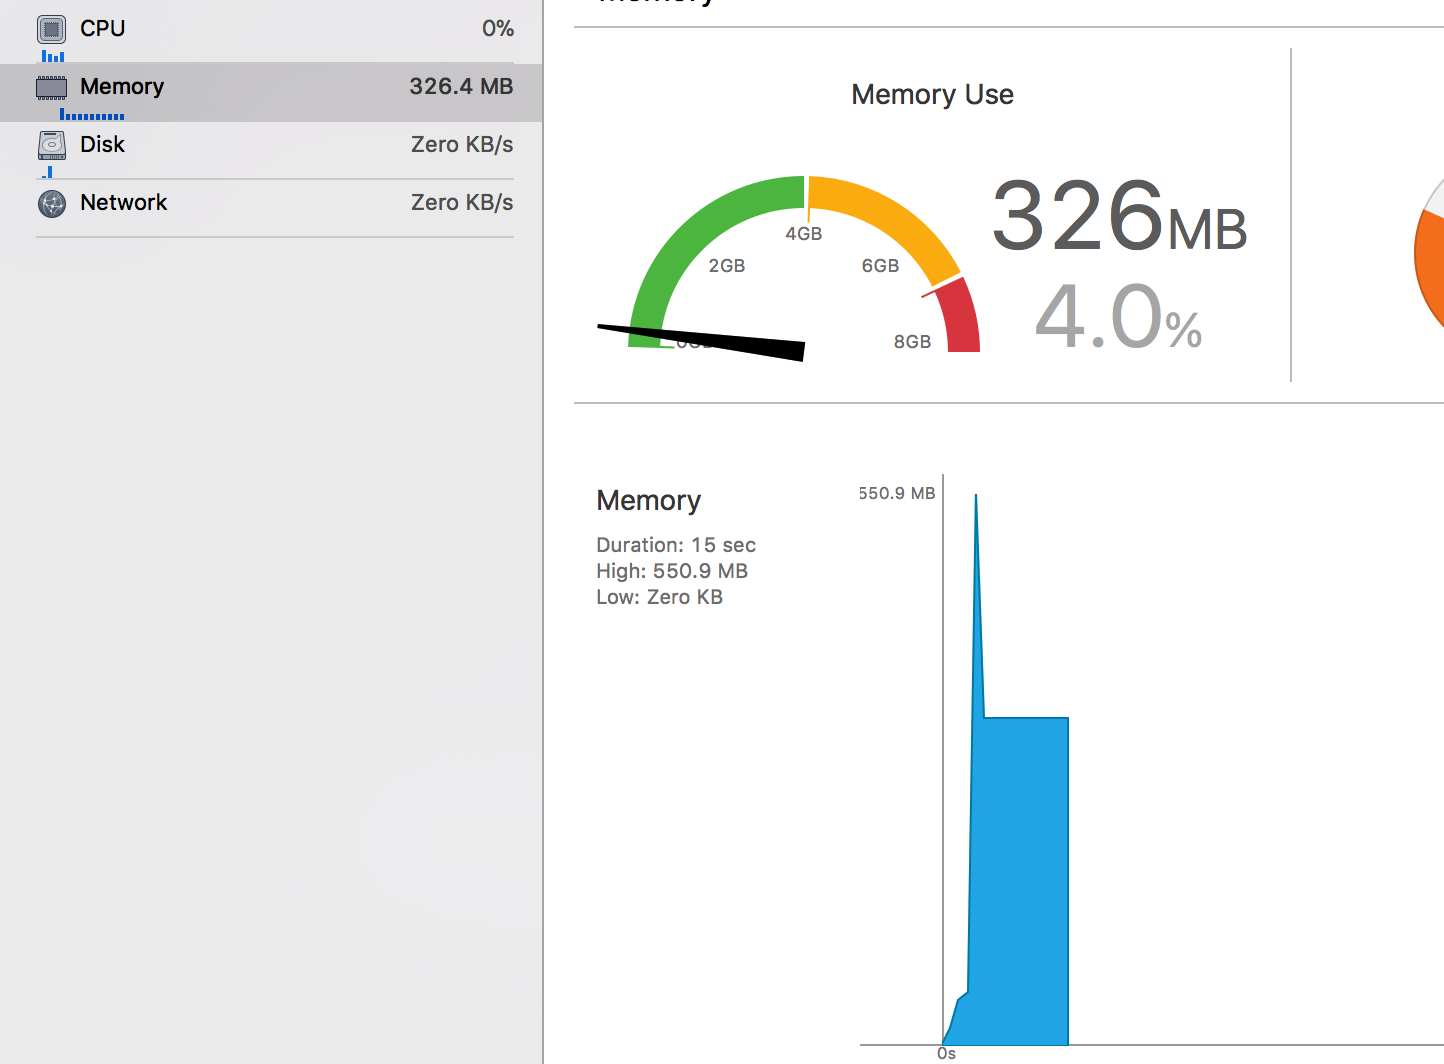
按照常规,还是看看内存飙升的原因.在Instrument中看: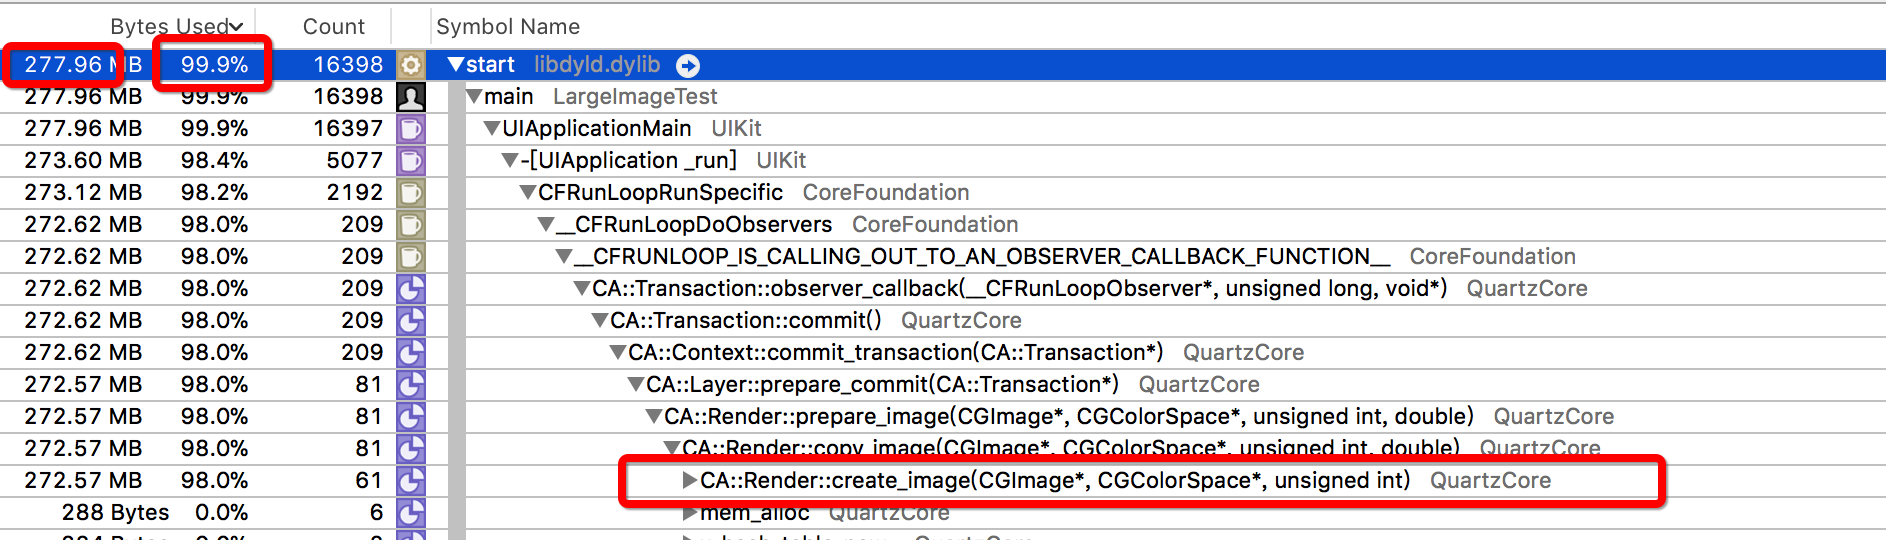
从图上可以看出来,内存主要消耗在了Rend malloc这个方法上,由于UIKit的黑盒,猜测这个是在渲染时候导致内存飙升.可以同步猜测是有与在draw是导致CPU使用过高.
根据各个大佬经验与使用,在使用
SDWebImage和YYImage同样会遇到这样的问题.参考链接使用SDWebImage和YYImage下载高分辨率图,导致内存暴增的解决办法,但是和上诉的原因不太一样.
问题已经出来了,如何解决呢?苹果爸爸已经给出了解决方案:
苹果官方Demo
解析官方Demo
显示图片的载体 : CATiledLayer
- 这个是为解决加载大图造成的性能问题的一种解决方案.将一张大图分成多个小图连续加载.避免了CA强制使用CPU进行渲染,而是使用了手机端渲染最快的GPU进行图片的渲染.
CATiledLayer的连续加载可以理解成一种伪连续.实际上是将一个大图更加像素量分成多块,通过GPU将这多块使用bitmap绘制在一个上下文中,并将上下文生成图片,显示到CATiledLayer上.
实现流程
通过给定图片生成一个上下文
1
2
3
4
5
6
7
8
9
10
11
12
13
14
15
16
17
18
19
20
21
22
23
24
25
26
27
28
29
30
31
32
33
34
35
36
37
38
39
40
41
42
43
44
45
46
47
48
49
50
sourceImage = [[UIImage alloc] initWithContentsOfFile:[[NSBundle mainBundle] pathForResource:iconName ofType:nil]];
if (sourceImage == nil) {
NSLog(@"传入的图片路径有问题");
return;
}
// 图片大小
sourceSize.width = CGImageGetWidth(sourceImage.CGImage);
sourceSize.height = CGImageGetHeight(sourceImage.CGImage);
// 总像素大小
sourceTotalPixels = sourceSize.width * sourceSize.height;
imageScale = destTotalPixels / sourceTotalPixels;
// 设置在屏幕上显示的大小
destSize.width = (int)(sourceSize.width * imageScale);
destSize.height = (int)(sourceSize.height * imageScale);
// 使用bitmap进行画图,创建一个bitmap 上下文.
// 使用RGB 在iOS GPU中有优化
CGColorSpaceRef colorSpace = CGColorSpaceCreateDeviceRGB();
int bytesPerRow = bytesPerPixel * destSize.width;
/// 向内存申请需要显示到屏幕的内存
void * destBitmapData = malloc(bytesPerRow * destSize.height);
if (destBitmapData == NULL) {
NSLog(@"向内存申请需要显示到屏幕的内存失败");
return;
}
/**
data 指向要渲染的绘制内存的地址。这个内存块的大小至少是(bytesPerRow*height)个字节
width bitmap的宽度,单位为像素,必须是整形
height bitmap的高度,单位为像素,必须是整形
bitsPerComponent 内存中像素的每个组件的位数.例如,对于32位像素格式和RGB 颜色空间,你应该将这个值设为8.
bytesPerRow bitmap的每一行在内存所占的比特数
colorspace bitmap上下文使用的颜色空间。
bitmapInfo 指定bitmap是否包含alpha通道,像素中alpha通道的相对位置,像素组件是整形还是浮点型等信息的字符串。
参考链接 : https://blog.csdn.net/thanklife/article/details/25790433
*/
destContext = CGBitmapContextCreate(destBitmapData, destSize.width, destSize.height, 8, bytesPerRow, colorSpace, kCGImageAlphaPremultipliedLast);
if (destContext == NULL) {
free(destBitmapData);
NSLog(@"根据申请的内存创建上下文失败");
return;
}
CGColorSpaceRelease(colorSpace);这里需要有几个注意点:
- 由于使用bitmap的针对像素上的绘制,在计算图片宽高时候需要使用
CGImageGetWidth来进行计算 - 这里将大图显示到手机端时候需要将大图进行一个比例的缩放,这个缩放中需要两个参数
- kDestImageSizeMB /// 定义图片总大小 MB
- pixelsPerMB /// 每MB有多少像素,262144.0f时候苹果会有优化
- 将 kDestImageSizeMB * pixelsPerMB 计算结果除以图片实际总像素即可得到从原图到生成显示来源图的比例
- 在使用
CGBitmapContextCreate方法生成的上下文中size_t width, size_t height,参数类型是size_t必须是整形的,否则创建失败.
- 由于使用bitmap的针对像素上的绘制,在计算图片宽高时候需要使用
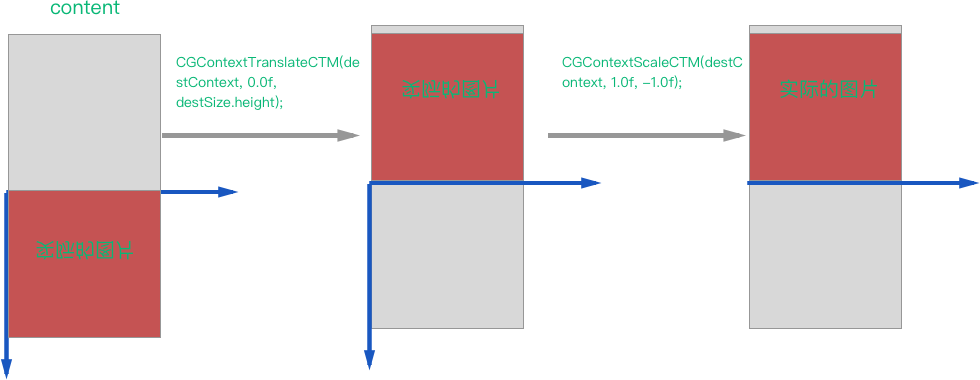
翻转矩阵. 因为使用Core Graphics后,采用的是Mac坐标系,坐标原点在左下角,为了对应到iOS坐标系,需要将上下文进行翻转
1
2
3
// 翻转矩阵
CGContextTranslateCTM(destContext, 0.0f, destSize.height);
CGContextScaleCTM(destContext, 1.0f, -1.0f);注意点:
- CGContextTranslateCTM : 这里height是显示图片的高度,
CGContextScaleCTM : 这里的-1 是将上下翻转
设置tile数据块.
1
2
3
4
5
6
7
8
9
10
11
// 设置tile的大小
sourceTileRect.size.width = sourceSize.width;
// 这个是动态需要加载图片的高度,是通过tile提前设定的总大小/宽度来算的
sourceTileRect.size.height = (tileTotalPixels / sourceTileRect.size.width);
NSLog(@"source tile size : %f x %f",sourceTileRect.size.width,sourceTileRect.size.height);
sourceTileRect.origin.x = 0.0f;
/// 将图片的rect 转换到实际需要展示的.
destTileRect.size.width = destSize.width;
destTileRect.size.height = sourceTileRect.size.height * imageScale;
destTileRect.origin.x = 0.0f;
NSLog(@" tile size : %f x %f",destTileRect.size.width,destTileRect.size.height);注意点:
- 在计算sourceTileRect.size.height时候使用的tileTotalPixels是需要提前指定好每次要加载像素的大小的.
- sourceSeemOverlap 这里是上一次加载和下一次的重合的大小.
创建分块加载图片对象
1
2
/// 开始创建一个图片对象,分块加载图片.
CGImageRef sourceTileImageRef;没啥好注意的,用完之后释放就行了.(^__^) 嘻嘻……
计算分割块数
1
2
3
4
5
6
/// 需要的块数;
int interations = (int) (sourceSize.height / sourceTileRect.size.height);
int remainder = (int)sourceSize.height % (int)sourceTileRect.size.height;
if (remainder) {// 如果有剩余的话,将块数+1;
interations ++;
}注意点:
- 如果不是正好对原图进行整数分割,需要将剩余部分+1
计算重合后的高度
1
2
3
// 这里还需要将分块的高度加上重叠部分的
sourceTileRect.size.height += sourceSeemOverlap;
destTileRect.size.height += destSeemOverlap;对多块图片进行拼接
1
2
3
4
5
6
7
8
9
10
11
12
13
14
15
16
17
18
19
for (int i = 0; i < interations; i ++) {
NSLog(@"第 %d 块 ,总计- %d 块",i+1,interations);
sourceTileRect.origin.y = i * sourceTileHeight + sourceSeemOverlap;
// 这里因为CG框架是Mac坐标系,需要从下往上话
destTileRect.origin.y = (destSize.height) - ((i + 1) * sourceTileHeight * imageScale + destSeemOverlap);
sourceTileImageRef = CGImageCreateWithImageInRect(sourceImage.CGImage, sourceTileRect);
if (i == interations - 1 && remainder) { // 如果最后一块的话处理不够一块高度,
CGFloat tmp = destTileRect.size.height;
destTileRect.size.height = CGImageGetHeight(sourceTileImageRef);
tmp -= destTileRect.size.height;
destTileRect.origin.y += tmp;
}
CGContextDrawImage(destContext, destTileRect, sourceTileImageRef);
CGImageRelease(sourceTileImageRef);
}
CGContextRelease(destContext);
注意点:
- CGImageCreateWithImageInRect这个使用的是像素单位
- CGImageCreateWithImageInRect只返回了在给定范围内的CGImageRef,如果在在rect内只包含部分图片,则返回这个部分图片生成的CGImageRef
- **这里CGImageCreateWithImageInRect方法的坐标系是iOS坐标系,而CGContextDrawImage却是Mac坐标系,在画图时候回,方向是相反的**

> 到这里已经生成了一个具有完整图片的上下文.之后需要将这个上下文绘制到`CATiledLayer`上去
将上下文生成图片
1
2
3
4
5
6
7
8
9
10
11
12
13
14
15
16
17
18
19
20
21
22
CGRect imageRect = CGRectMake(0.0f,0.0f,CGImageGetWidth(destImage.CGImage),CGImageGetHeight(destImage.CGImage));
CGFloat newScale = self.frame.size.width/imageRect.size.width;
CGFloat scaleY =self.frame.size.height/imageRect.size.height;
// minimumScale = imageScale * 0.75f;
NSLog(@"imageScale: %f",imageScale);
imageRect.size = CGSizeMake(imageRect.size.width*newScale, imageRect.size.height*newScale);
HD_InfactView * frontTiledView = [[HD_InfactView alloc]initWithFrame:imageRect image:destImage scaleX:newScale scaleY:scaleY];
[self addSubview:frontTiledView];
/// HD_InfactView.m
-(void)drawRect:(CGRect)rect {
CGContextRef context = UIGraphicsGetCurrentContext();
CGContextSaveGState(context);
// Scale the context so that the image is rendered
// at the correct size for the zoom level.
CGContextScaleCTM(context, imageScale,imageScale);
CGContextDrawImage(context, imageRect, image.CGImage);
CGContextRestoreGState(context);
}
注意点:
- 这里需要将生成的图片按比例的缩放到View中去.
既然已经完成了基本工作了,来看看现在的情况: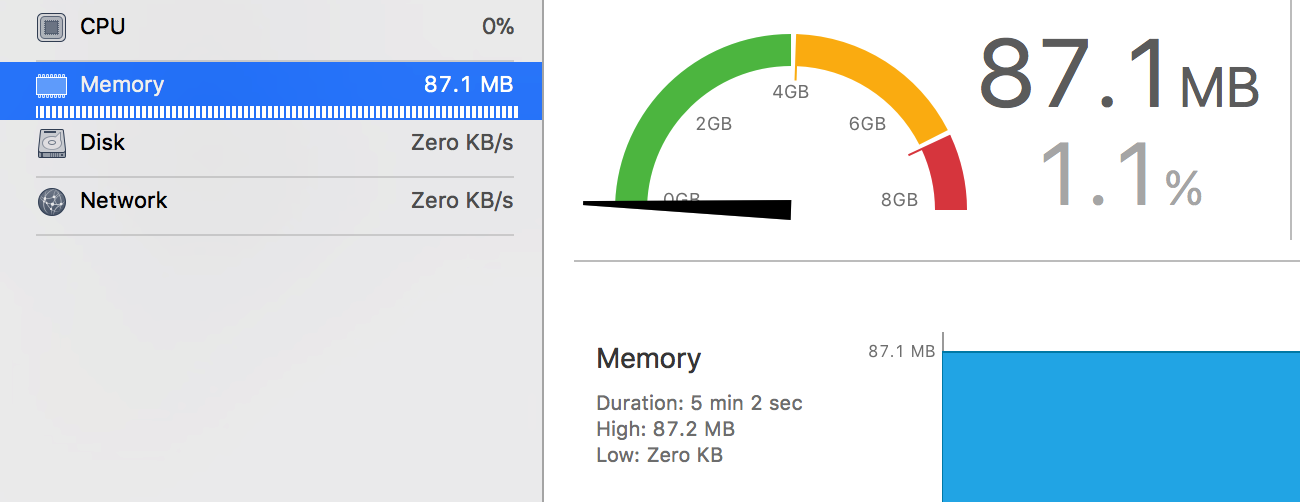
总结
- 使用了CGBitmapContextCreate这个进行解压缩操作.
- 这个加载过程使用了CATiledLayer 这个类在显示时候使用了GPU去高效渲染.
- 中间坐标的转换需要重点注意!!!